Thank you! Your submission has been received!
Oops! Something went wrong while submitting the form.
Raspberry pi pico 2w
90 min
Share

كيفية استخدام حساس الصوت مع لوحة الراسبيرى باى بيكو

فى هذا الدرس سنتعلم كيفية استخدام حساس الصوت مع لوحة راسبيرى باى بيكو 2W, بحيث سنقوم بعرض قيمة شدة الصوت على الشاشة و سنبنى نظام لانارة مصباح عند التصفيق مرتين متتاليتين.

Project Video

Overview

Getting the Items

Raspberry Pi Pico 2 wireless
Get Item
Microphone Module
Get Item
Clear 5mm LED (5 pack)
Get Item
1/4 Watt Resistor (20 Pack)
Get Item
Full-size Breadboard
Get Item
Jumper Wires - Male to Male (40 Pack)
Get Item

Steps

Wiring it Up

قم بتوصيل الأسلاك بين لوحة راسبيرى باى بيكو 2W وحساس الصوت والمصباح الأبيض كما فى الصورة التالية:

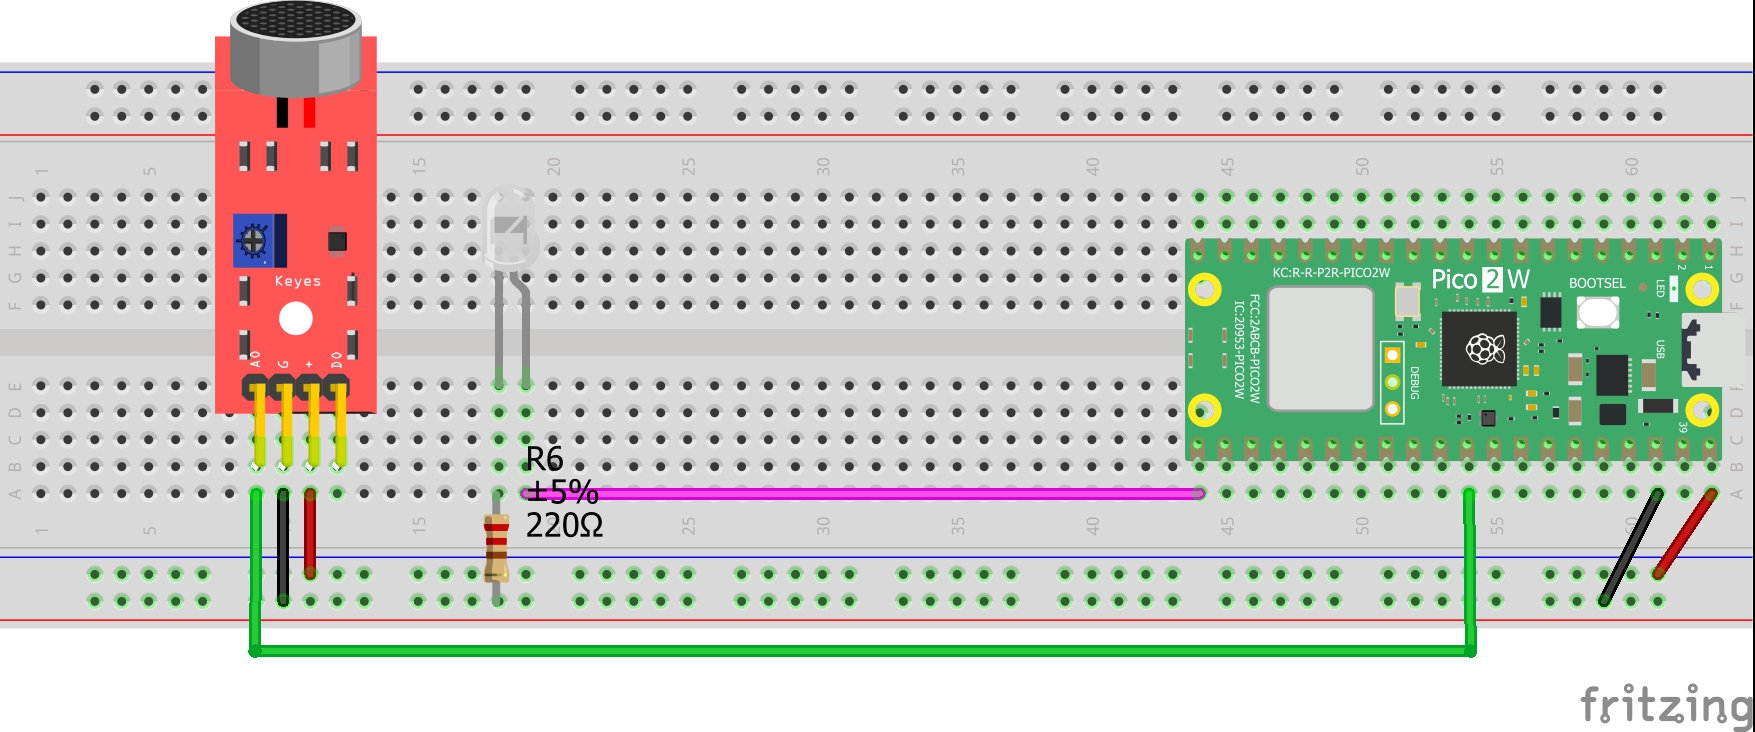
التوصيلات من لوحة راسبيرى باى بيكو 2W :

• نقوم بتوصيل منفذ ال VBUS بلوحة راسبيرى باى بيكو2W   ← المنافذ الموجبة بلوحة التجارب

• منفذ ال GND بلوحة راسبيرى باى بيكو2W  ←المنافذ السالبة بلوحة التجارب

التوصيلات من المقاومة الضوئية :

• منفذ ال VCC بحساس الصوت ← المنافذ الموجبة بلوحة

• منفذال GNDبحساس الصوت ← المنافذ السالبة بلوحة التجارب

• منفذ A0 بحساس الصوت ← منفذ رقم 26 فى لوحة راسبيرى باى بيكو W2

التوصيلات من مصباح الأبيض :

• الطرف الموجب من المصباح الأبيض ← منفذ رقم 16 فى لوحة راسبيرى باى بيكو 2W

• الطرف السالب من المصباح الأبيض ← مقاومة 220 اوم ← المنافذ السالبة بلوحة التجارب

Coding

وظيفة الكود البرمجى الأول هى عرض قيمة شدة الصوت على الشاشة بينما وظيفة الكود البرمجى الثانى هى انارة مصباح عند التصفيق مرتين متتاليتين.

'''

Voltaat Learn (http://learn.voltaat.com)

Link to the full tutorial:

Tutorial: How to use the microphone sensor with the Raspberry Pi Pico board.

This sketch prints Sound intensity value.

Note: You can use this sketch with any Raspberry Pi Pico.

'''

from machine import ADC

import time

# Define pin for microphone (A0 -> GP26)

mic = ADC(26)

while True:

   # Read raw value from microphone (0 → 65535)

   raw_value = mic.read_u16()


   # Convert to percentage (0 → 100)

   percent = int((raw_value / 65535) * 100)


   # Print sound intensity percentage

   print("Sound Intensity:", percent, "%")


   time.sleep(0.1)  # Small delay for readability

'''

Voltaat Learn (http://learn.voltaat.com)

Link to the full tutorial:

Tutorial: How to use the microphone sensor with the Raspberry Pi Pico board.

This sketch lights up a white led when you clap twice in a row..

Note: You can use this sketch with any Raspberry Pi Pico.

'''

from machine import Pin, ADC

import time

# Define pins

mic = ADC(26)          # Analog output from microphone (A0)

led = Pin(16, Pin.OUT)

# Variables

clap = 0

detection_range_start = 0

detection_range = 0

status_lights = False

# Threshold for clap detection (adjust experimentally)

THRESHOLD = 58500  # range: 0 → 65535

while True:

   raw_value = mic.read_u16()

   if raw_value > THRESHOLD:  # Clap detected

       if clap == 0:

           detection_range_start = detection_range = time.ticks_ms()

           clap += 1

       elif clap > 0 and time.ticks_diff(time.ticks_ms(), detection_range) >= 50:

           detection_range = time.ticks_ms()

           clap += 1

       # Small delay to avoid multiple triggers for one clap

       time.sleep(0.001)

   # If more than 400 ms passed since first clap

   if time.ticks_diff(time.ticks_ms(), detection_range_start) >= 400:

       if clap == 2:

           if not status_lights:

               status_lights = True

               led.value(1)   # Turn ON LED

               print("LED ON")

           else:

               status_lights = False

               led.value(0)   # Turn OFF LED

               print("LED OFF")

       clap = 0

Testing it Out

بعد رفع الكود البرمجي الأول ستجد أنه يتم عرض قيمة شدة الصوت على الشاشة، وبعد رفع الكود البرمجي الثاني ستجد أنه يتم إنارة المصباح عند التصفيق مرتين متتاليتين.

Resources

No items found.