


Resource Name

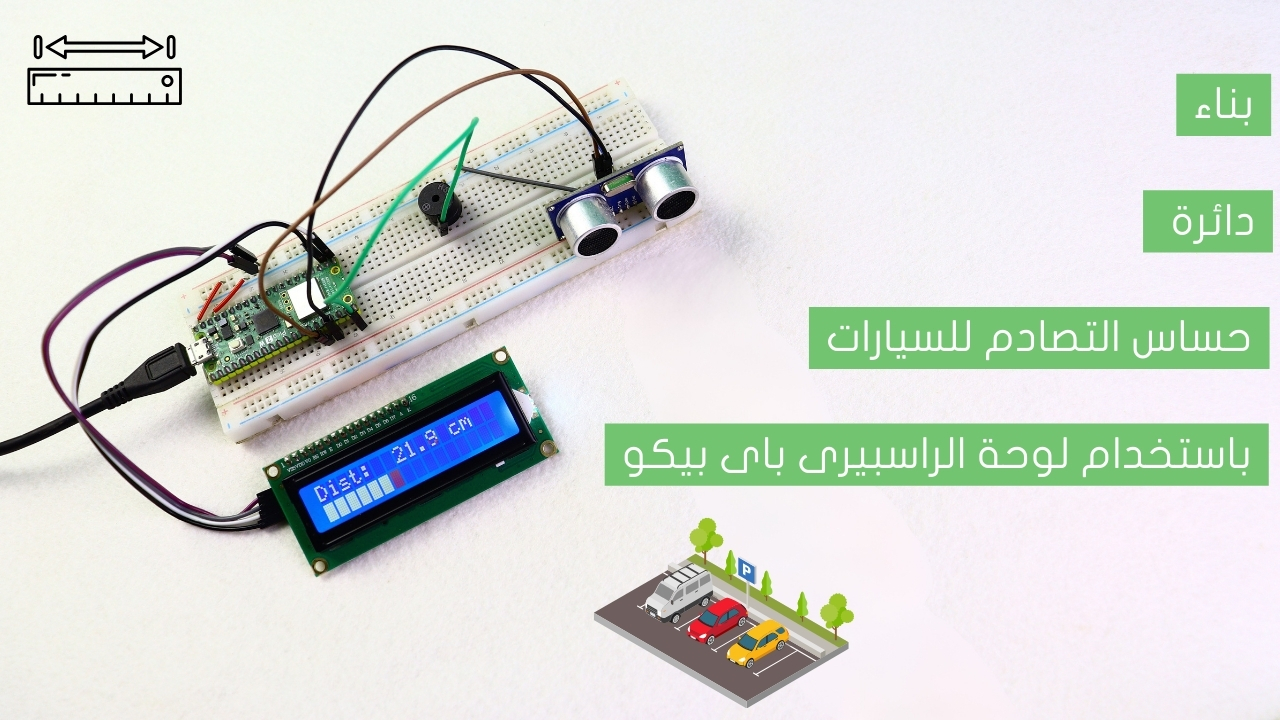
في هذا الدرس سنتعلم كيفية التحكم في المصابيح والصفارة من خلال برنامج يعمل على الحاسوب، بحيث يمكن التحكم في إنارة مصباح أزرق وأحمر وأصفر وأخضر، والتحكم في تشغيل وإطفاء الصفارة.

قم بتوصيل الأسلاك بين لوحة راسبيري باي بيكو 2W وبين المصابيح والصفارة كما في الصورة التالية:
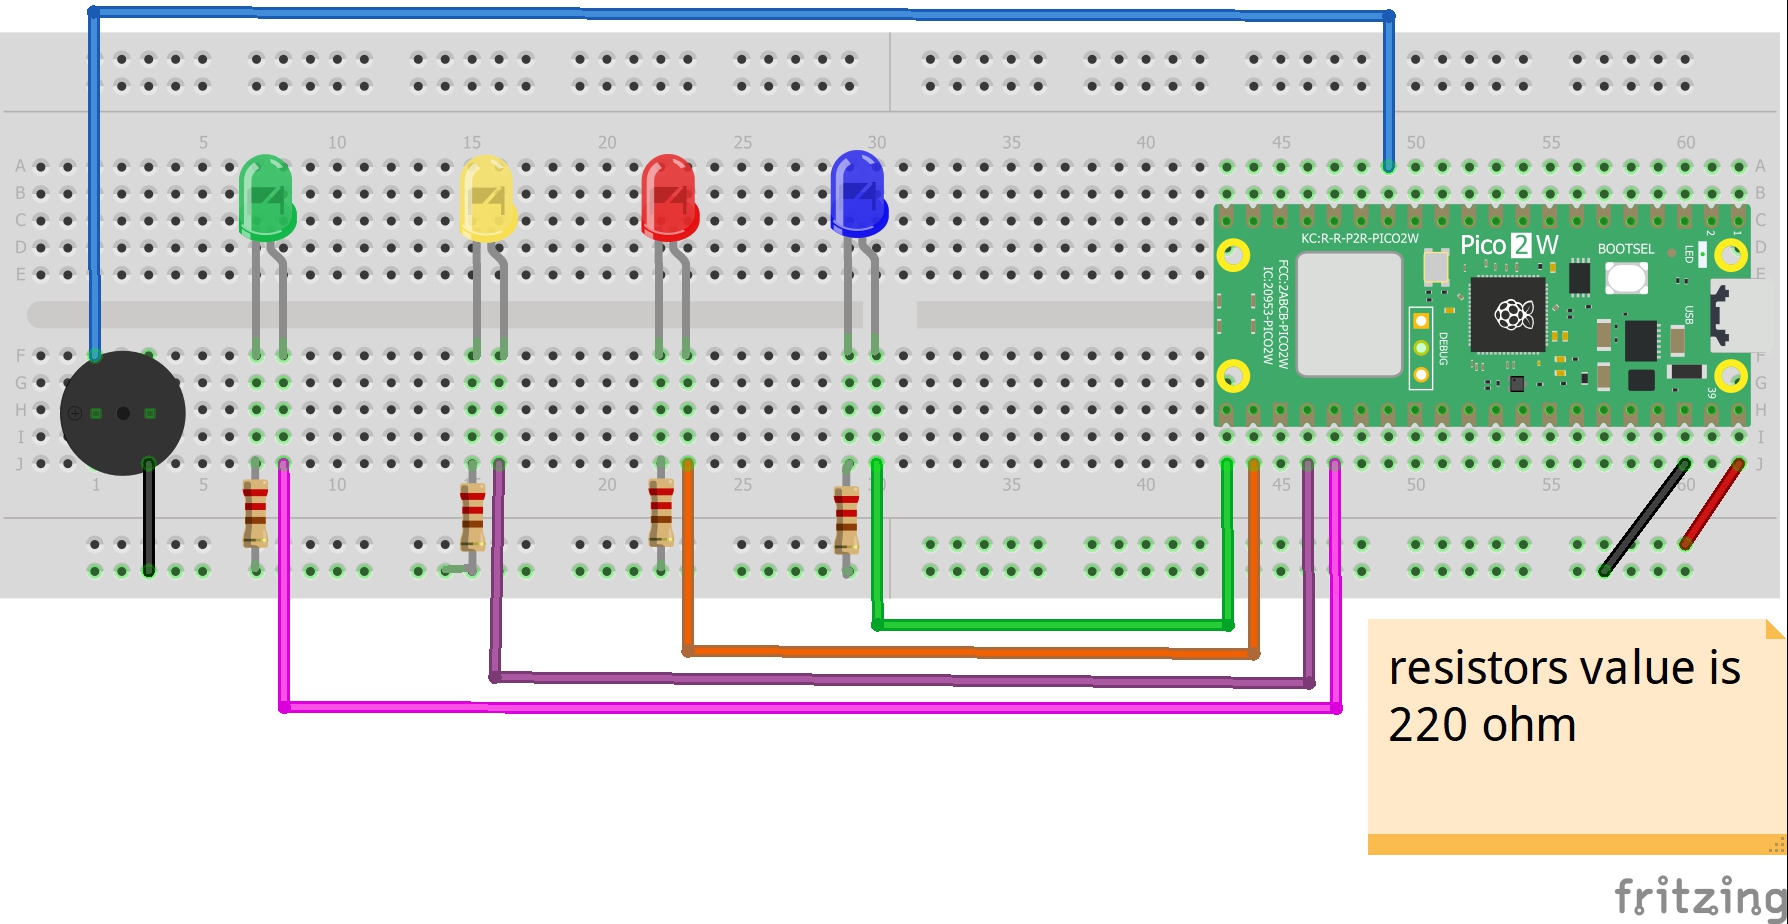
التوصيلات من لوحة راسبيرى باى بيكو 2W :
•نقوم بتوصيل منفذ ال VBUS بلوحة راسبيرى باى بيكو2W ←المنافذ الموجبة بلوحة التجارب
•منفذ ال GND بلوحة راسبيرى باى بيكو 2W ←المنافذ السالبة بلوحة التجارب
التوصيلات من المصابيح:
• الطرف السالب لكل مصباح ← مقاومة 220 أوم ← المنافذ السالبة بلوحة التجارب
• الطرف الموجب للمصباح الأزرق ← منفذ رقم 16 فى لوحة راسبيرى باى بيكو 2W
• الطرف الموجب للمصباح الأحمر ← منفذ رقم 17 فى لوحة راسبيرى باى بيكو 2W
• الطرف الموجب للمصباح الأصفر ← منفذ رقم 18 فى لوحة راسبيرى باى بيكو 2W
• الطرف الموجب للمصباح الأخضر ← منفذ رقم 19 فى لوحة راسبيرى باى بيكو 2W
التوصيلات من الصفارة :
• الطرف الأول للصفارة ← منفذ رقم 10 فى لوحة راسبيرى باى بيكو 2W
• الطرف الثانى للصفارة ← المنافذ السالبة بلوحة التجارب
وظيفة النص البرمجي الأول هي التحكم في المصابيح والصفارة من خلال برنامج يعمل على الحاسوب، بحيث يمكن التحكم في إنارة مصباح أزرق وأحمر وأصفر وأخضر، والتحكم في تشغيل وإطفاء الصفارة. أما وظيفة النص البرمجي الثاني فهي إنشاء نافذة التحكم في المصابيح والصفارة.
'''
Voltaat Learn (http://learn.voltaat.com)
Link to the full tutorial:
Tutorial: Controlling the operation of lights and a buzzer via computer using a Raspberry Pi Pico board
The function of this code is to control the operation of lamps and a buzzer using a computer through the
Raspberry Pi Pico board.
Note: You can use this sketch with any Raspberry Pi Pico.
'''
import machine
import time
import sys
import select
print("=" * 50)
print("🎯 نظام التحكم في المصابيح والصافرة - الإصدار النهائي")
print("=" * 50)
# ============================================
# 1. تهيئة المخارج
# ============================================
print("\n🔧 جارٍ تهيئة المخارج...")
# إعداد المخارج مباشرة
led1 = machine.Pin(16, machine.Pin.OUT)
led2 = machine.Pin(17, machine.Pin.OUT)
led3 = machine.Pin(18, machine.Pin.OUT)
led4 = machine.Pin(19, machine.Pin.OUT)
buzzer = machine.Pin(10, machine.Pin.OUT)
# إطفاء الكل
led1.off()
led2.off()
led3.off()
led4.off()
buzzer.off()
print("✅ المصابيح والصافرة جاهزة")
# ============================================
# 2. اختبار النظام
# ============================================
print("\n🧪 جارٍ اختبار النظام...")
def system_test():
"""اختبار جميع المكونات"""
# تشغيل المصابيح بالتسلسل
for i, led in enumerate([led1, led2, led3, led4], 1):
led.on()
print(f" 💡 المصباح {i}: ON")
time.sleep(0.3)
time.sleep(0.5)
# اختبار الصافرة
print(" 🔊 الصافرة: ON")
buzzer.on()
time.sleep(0.3)
buzzer.off()
print(" 🔊 الصافرة: OFF")
# إطفاء الكل
for i, led in enumerate([led1, led2, led3, led4], 1):
led.off()
print(f" 💡 المصباح {i}: OFF")
time.sleep(0.2)
system_test()
print("✅ اختبار النظام مكتمل")
# ============================================
# 3. إعداد UART - الطريقة الأكيدة
# ============================================
print("\n🔌 جارٍ تهيئة UART...")
# المحاولة 1: UART0 على GP0/GP1
try:
uart = machine.UART(0, baudrate=115200, tx=machine.Pin(0), rx=machine.Pin(1))
print("✅ UART0 على TX=GP0, RX=GP1")
except:
# المحاولة 2: UART0 على GP12/GP13
try:
uart = machine.UART(0, baudrate=115200, tx=machine.Pin(12), rx=machine.Pin(13))
print("✅ UART0 على TX=GP12, RX=GP13")
except:
# المحاولة 3: UART الافتراضي
try:
uart = machine.UART(0, baudrate=115200)
print("✅ UART0 على الدبابيس الافتراضية")
except Exception as e:
print(f"❌ فشل تهيئة UART: {e}")
sys.exit()
# تنظيف المخزن المؤقت
time.sleep(0.5)
if uart.any():
uart.read()
# ============================================
# 4. إعداد sys.stdin للقراءة من USB
# ============================================
print("\n📡 جارٍ تهيئة استقبال الأوامر...")
# هذا الجزء مهم جداً لاستقبال الأوامر من USB
import uselect
poll = uselect.poll()
poll.register(sys.stdin, uselect.POLLIN)
# ============================================
# 5. دوال التحكم المباشرة
# ============================================
def control(command):
"""تنفيذ أمر التحكم"""
cmd = command.strip().upper()
print(f"🎯 معالجة الأمر: {cmd}")
if cmd == "L1:ON":
led1.on()
return "✅ المصباح 1 مشتغل"
elif cmd == "L1:OFF":
led1.off()
return "✅ المصباح 1 مطفأ"
elif cmd == "L2:ON":
led2.on()
return "✅ المصباح 2 مشتغل"
elif cmd == "L2:OFF":
led2.off()
return "✅ المصباح 2 مطفأ"
elif cmd == "L3:ON":
led3.on()
return "✅ المصباح 3 مشتغل"
elif cmd == "L3:OFF":
led3.off()
return "✅ المصباح 3 مطفأ"
elif cmd == "L4:ON":
led4.on()
return "✅ المصباح 4 مشتغل"
elif cmd == "L4:OFF":
led4.off()
return "✅ المصباح 4 مطفأ"
elif cmd == "B:ON":
buzzer.on()
return "✅ الصافرة تعمل"
elif cmd == "B:OFF":
buzzer.off()
return "✅ الصافرة متوقفة"
elif cmd == "B:BEEP":
buzzer.on()
time.sleep(0.2)
buzzer.off()
return "✅ تم تشغيل تنبيه قصير"
elif cmd == "ALL:ON":
led1.on()
led2.on()
led3.on()
led4.on()
return "✅ جميع المصابيح مشتغلة"
elif cmd == "ALL:OFF":
led1.off()
led2.off()
led3.off()
led4.off()
buzzer.off()
return "✅ جميع المكونات مطفأة"
elif cmd == "TEST":
system_test()
return "✅ اختبار النظام مكتمل"
elif cmd == "STATUS":
status = [
f"L1:{'ON' if led1.value() else 'OFF'}",
f"L2:{'ON' if led2.value() else 'OFF'}",
f"L3:{'ON' if led3.value() else 'OFF'}",
f"L4:{'ON' if led4.value() else 'OFF'}",
f"BUZZER:{'ON' if buzzer.value() else 'OFF'}"
]
return "STATUS:" + ",".join(status)
elif cmd == "HELP" or cmd == "?":
return """🎮 الأوامر المتاحة:
L1:ON/OFF - التحكم في المصباح 1
L2:ON/OFF - التحكم في المصباح 2
L3:ON/OFF - التحكم في المصباح 3
L4:ON/OFF - التحكم في المصباح 4
B:ON/OFF - التحكم في الصافرة
B:BEEP - تنبيه قصير
ALL:ON - تشغيل جميع المصابيح
ALL:OFF - إطفاء جميع المكونات
TEST - اختبار النظام
STATUS - عرض الحالة الحالية
HELP - عرض هذه الرسالة"""
else:
return f"❌ أمر غير معروف: '{cmd}'"
# ============================================
# 6. عرض رسالة الترحيب
# ============================================
print("\n" + "=" * 50)
print("🚀 النظام جاهز للاستخدام")
print("=" * 50)
print("\n📋 استخدم إحدى الطرق التالية:")
print("1. عبر Serial Monitor (115200 baud)")
print("2. عبر REPL في Thonny")
print("3. عبر واجهة الحاسوب")
print("\n🔧 أرسل 'HELP' لرؤية جميع الأوامر")
print("🔧 أرسل 'TEST' لاختبار النظام")
print("=" * 50 + "\n")
# إرسال رسالة ترحيب عبر UART
uart.write("🎯 نظام التحكم جاهز - أرسل 'HELP' للمساعدة\r\n")
# ============================================
# 7. الحلقة الرئيسية - الطريقة المؤكدة
# ============================================
print("⏳ جاري الاستماع للأوامر...")
# إعداد وقت آخر نشاط
last_activity = time.ticks_ms()
welcome_sent = False
while True:
try:
# ====================================
# الطريقة 1: القراءة من sys.stdin (REPL/USB)
# ====================================
if poll.poll(0):
# هناك بيانات في stdin (من USB)
data = sys.stdin.readline()
if data:
cmd = data.strip()
if cmd:
# معالجة الأمر
response = control(cmd)
print(f"📤 رد: {response}")
# إرسال الرد عبر UART أيضاً
if response:
uart.write(response + "\r\n")
last_activity = time.ticks_ms()
welcome_sent = False
# ====================================
# الطريقة 2: القراءة من UART مباشرة
# ====================================
if uart.any():
# قراءة جميع البيانات المتاحة
data = uart.read()
if data:
try:
cmd = data.decode('utf-8').strip()
if cmd:
print(f"📥 أمر من UART: '{cmd}'")
# معالجة الأمر
response = control(cmd)
# إرسال الرد
if response:
uart.write(response + "\r\n")
print(f"📤 رد عبر UART: {response}")
last_activity = time.ticks_ms()
welcome_sent = False
except Exception as e:
print(f"❌ خطأ في فك الترميز: {e}")
uart.write("❌ خطأ في معالجة الأمر\r\n")
# ====================================
# إرسال رسالة ترحيب إذا مرت فترة بدون نشاط
# ====================================
current_time = time.ticks_ms()
if time.ticks_diff(current_time, last_activity) > 5000 and not welcome_sent:
uart.write("⏳ في انتظار الأوامر... أرسل 'HELP' للمساعدة\r\n")
print("⏳ في انتظار الأوامر...")
welcome_sent = True
# انتظار قصير
time.sleep(0.01)
except KeyboardInterrupt:
print("\n\n🛑 إيقاف النظام...")
break
except Exception as e:
print(f"⚠️ خطأ غير متوقع: {e}")
time.sleep(1)
# التنظيف
print("\n🔌 جارٍ إطفاء جميع المكونات...")
led1.off()
led2.off()
led3.off()
led4.off()
buzzer.off()
print("✅ النظام متوقف")
print("=" * 50)
'''
Voltaat Learn (http://learn.voltaat.com)
Link to the full tutorial:
Tutorial: Controlling the operation of lights and a buzzer via computer using a Raspberry Pi Pico board
The function of this code is to create a window to control the operation of the lights and the alarm device
using a computer via the Raspberry Pi Pico board.
Note: You can use this sketch with any Raspberry Pi Pico.
'''
import tkinter as tk
from tkinter import ttk, messagebox, scrolledtext
import serial
import serial.tools.list_ports
import threading
import time
import queue
class FixedDesktopController:
def __init__(self, root):
self.root = root
self.root.title("نظام التحكم في المصابيح والصفارة - Raspberry Pi Pico")
self.root.geometry("600x900")
self.root.resizable(False, False)
# متغيرات الاتصال
self.serial_port = None
self.connected = False
self.data_queue = queue.Queue()
# إعداد الواجهة
self.setup_ui()
# تحديث المنافذ
self.update_ports()
# بدء خيط قراءة البيانات
self.start_read_thread()
def setup_ui(self):
# تخصيص النافذة
self.root.configure(bg='#f0f0f0')
# إطار العنوان
title_frame = tk.Frame(self.root, bg='#4a6fa5', height=70)
title_frame.pack(fill='x', pady=(0, 10))
title_frame.pack_propagate(False)
tk.Label(title_frame, text="🎯 متحكم Raspberry Pi Pico",
font=('Tahoma', 10, 'bold'), bg='#4a6fa5', fg='white').pack(pady=10)
tk.Label(title_frame, text="التحكم في 4 مصابيح وصفارة",
font=('Tahoma', 10), bg='#4a6fa5', fg='#e0e0e0').pack()
# إطار الاتصال
conn_frame = tk.LabelFrame(self.root, text="⚙️ إعدادات الاتصال",
font=('Tahoma', 11, 'bold'),
bg='#f0f0f0')
conn_frame.pack(fill='x', padx=15, pady=5)
# شبكة العناصر
tk.Label(conn_frame, text="المنفذ:", bg='#f0f0f0',
font=('Tahoma', 10)).grid(row=0, column=0, padx=5, pady=10, sticky='w')
self.port_var = tk.StringVar()
self.port_combo = ttk.Combobox(conn_frame, textvariable=self.port_var,
font=('Tahoma', 10), width=20)
self.port_combo.grid(row=0, column=1, padx=5, pady=10)
# زر التحديث
tk.Button(conn_frame, text="🔄 تحديث", command=self.update_ports,
bg='#6c757d', fg='white', font=('Tahoma', 9),
padx=10).grid(row=0, column=2, padx=5, pady=10)
# زر الاتصال
self.connect_btn = tk.Button(conn_frame, text="🔗 اتصال",
command=self.toggle_connection,
bg='#28a745', fg='white',
font=('Tahoma', 10, 'bold'),
padx=15)
self.connect_btn.grid(row=0, column=3, padx=5, pady=10)
# إطار المصابيح
leds_frame = tk.LabelFrame(self.root, text="💡 التحكم في المصابيح",
font=('Tahoma', 11, 'bold'),
bg='#f0f0f0')
leds_frame.pack(fill='both', expand=True, padx=15, pady=10)
# إنشاء أزرار المصابيح
self.led_buttons = {}
led_names = ['L1', 'L2', 'L3', 'L4']
led_texts = ['المصباح 1', 'المصباح 2', 'المصباح 3', 'المصباح 4']
for i in range(4):
frame = tk.Frame(leds_frame, bg='#f0f0f0')
frame.grid(row=i//2, column=i%2, padx=10, pady=15, sticky='nsew')
# عنوان المصباح
tk.Label(frame, text=led_texts[i], font=('Tahoma', 10, 'bold'),
bg='#f0f0f0').pack()
# زر التحكم
btn = tk.Button(frame, text="إطفاء",
font=('Tahoma', 10),
width=10, height=2,
bg='#dc3545', fg='white',
command=lambda n=led_names[i]: self.send_led_command(n))
btn.pack(pady=5)
self.led_buttons[led_names[i]] = btn
leds_frame.columnconfigure(i%2, weight=1)
# إطار الصافرة
buzzer_frame = tk.LabelFrame(self.root, text="🔊 التحكم في الصفارة",
font=('Tahoma', 11, 'bold'),
bg='#f0f0f0')
buzzer_frame.pack(fill='x', padx=15, pady=10)
# أزرار الصافرة
btn_frame = tk.Frame(buzzer_frame, bg='#f0f0f0')
btn_frame.pack(pady=10)
# زر الصافرة
self.buzzer_btn = tk.Button(btn_frame, text="تشغيل الصفارة",
font=('Tahoma', 10),
width=12, height=2,
bg='#dc3545', fg='white',
command=self.send_buzzer_command)
self.buzzer_btn.pack(side='left', padx=5)
# زر التنبيه القصير
tk.Button(btn_frame, text="تنبيه قصير",
font=('Tahoma', 10),
width=12, height=2,
bg='#ffc107', fg='black',
command=lambda: self.send_command("B:BEEP")).pack(side='left', padx=5)
# إطار التحكم الجماعي
control_frame = tk.LabelFrame(self.root, text="🎛️ تحكم جماعي",
font=('Tahoma', 11, 'bold'),
bg='#f0f0f0')
control_frame.pack(fill='x', padx=15, pady=10)
ctrl_frame = tk.Frame(control_frame, bg='#f0f0f0')
ctrl_frame.pack(pady=10)
tk.Button(ctrl_frame, text="تشغيل الكل",
font=('Tahoma', 10),
width=10, height=1,
bg='#28a745', fg='white',
command=lambda: self.send_command("ALL:ON")).pack(side='left', padx=5)
tk.Button(ctrl_frame, text="إطفاء الكل",
font=('Tahoma', 10),
width=10, height=1,
bg='#dc3545', fg='white',
command=lambda: self.send_command("ALL:OFF")).pack(side='left', padx=5)
tk.Button(ctrl_frame, text="اختبار النظام",
font=('Tahoma', 10),
width=10, height=1,
bg='#007bff', fg='white',
command=lambda: self.send_command("TEST")).pack(side='left', padx=5)
tk.Button(ctrl_frame, text="الحالة الحالية",
font=('Tahoma', 10),
width=10, height=1,
bg='#17a2b8', fg='white',
command=lambda: self.send_command("STATUS")).pack(side='left', padx=5)
# إطار سجل الأحداث
log_frame = tk.LabelFrame(self.root, text="📝 سجل الأحداث",
font=('Tahoma', 11, 'bold'),
bg='#f0f0f0')
log_frame.pack(fill='both', expand=True, padx=15, pady=10)
self.log_text = scrolledtext.ScrolledText(log_frame, height=6,
font=('Consolas', 9),
bg='#343a40', fg='white')
self.log_text.pack(fill='both', expand=True, padx=5, pady=5)
# شريط الحالة
self.status_bar = tk.Label(self.root, text="🔴 غير متصل",
bg='#495057', fg='white',
font=('Tahoma', 9),
anchor='w')
self.status_bar.pack(fill='x', side='bottom', ipady=3, padx=1)
def update_ports(self):
"""تحديث قائمة المنافذ المتاحة"""
try:
ports = []
for port in serial.tools.list_ports.comports():
port_info = f"{port.device} - {port.description}"
ports.append(port.device)
self.log_message(f"🔍 وجد: {port_info}")
self.port_combo['values'] = ports
if ports:
self.port_combo.set(ports[0])
else:
self.log_message("⚠️ لم يتم العثور على منافذ متاحة")
except Exception as e:
self.log_message(f"❌ خطأ في تحديث المنافذ: {e}")
def log_message(self, message):
"""تسجيل رسالة في السجل"""
timestamp = time.strftime("%H:%M:%S")
log_line = f"[{timestamp}] {message}\n"
self.log_text.insert(tk.END, log_line)
self.log_text.see(tk.END)
self.log_text.update()
# طباعة في الكونسول أيضاً
print(log_line.strip())
def toggle_connection(self):
"""تبديل حالة الاتصال"""
if not self.connected:
self.connect()
else:
self.disconnect()
def connect(self):
"""الاتصال بـ Pico"""
port = self.port_var.get()
if not port:
messagebox.showerror("خطأ", "الرجاء اختيار منفذ")
return
try:
self.log_message(f"🔌 محاولة الاتصال بـ {port}...")
# إغلاق الاتصال السابق إذا كان مفتوحاً
if self.serial_port and self.serial_port.is_open:
self.serial_port.close()
# فتح اتصال جديد مع إعدادات محددة
self.serial_port = serial.Serial(
port=port,
baudrate=115200,
bytesize=serial.EIGHTBITS,
parity=serial.PARITY_NONE,
stopbits=serial.STOPBITS_ONE,
timeout=0.5, # وقت انتظار قصير للقراءة
write_timeout=1, # وقت انتظار للكتابة
xonxoff=False, # تعطيل تحكم XON/XOFF
rtscts=False, # تعطيل تحكم RTS/CTS
dsrdtr=False # تعطيل تحكم DSR/DTR
)
# تنظيف المخزن المؤقت
self.serial_port.reset_input_buffer()
self.serial_port.reset_output_buffer()
# الانتظار لتهيئة الاتصال
time.sleep(2)
self.connected = True
self.connect_btn.config(text="🔌 قطع الاتصال", bg='#dc3545')
self.status_bar.config(text=f"✅ متصل بـ {port}", bg='#28a745')
self.log_message(f"✅ الاتصال ناجح بـ {port}")
# إرسال أمر اختبار
self.send_command("TEST", show_in_log=True)
except serial.SerialException as e:
error_msg = f"❌ فشل الاتصال: {str(e)}"
self.log_message(error_msg)
self.status_bar.config(text=error_msg, bg='#dc3545')
messagebox.showerror("خطأ اتصال", f"تعذر الاتصال:\n{str(e)}")
except Exception as e:
error_msg = f"❌ خطأ غير متوقع: {str(e)}"
self.log_message(error_msg)
self.status_bar.config(text=error_msg, bg='#dc3545')
def disconnect(self):
"""قطع الاتصال"""
try:
if self.serial_port and self.serial_port.is_open:
self.serial_port.close()
self.connected = False
self.connect_btn.config(text="🔗 اتصال", bg='#28a745')
self.status_bar.config(text="🔴 غير متصل", bg='#495057')
self.log_message("🔌 تم قطع الاتصال")
except Exception as e:
self.log_message(f"❌ خطأ أثناء قطع الاتصال: {e}")
def send_command(self, command, show_in_log=True):
"""إرسال أمر إلى Pico"""
if not self.connected or not self.serial_port:
self.log_message("⚠️ غير متصل - لا يمكن إرسال الأمر")
return False
try:
# إضافة نهاية السطر (\n) لإكمال الأمر
full_command = command + "\n"
# إرسال الأمر
bytes_sent = self.serial_port.write(full_command.encode('utf-8'))
self.serial_port.flush() # تأكيد الإرسال
if show_in_log:
self.log_message(f"📤 → {command}")
return True
except serial.SerialTimeoutException:
self.log_message(f"⏱️ timeout عند إرسال: {command}")
return False
except Exception as e:
self.log_message(f"❌ فشل إرسال '{command}': {e}")
return False
def start_read_thread(self):
"""بدء خيط قراءة البيانات"""
def read_from_serial():
while True:
if self.connected and self.serial_port and self.serial_port.is_open:
try:
# قراءة سطر كامل
if self.serial_port.in_waiting > 0:
try:
# قراءة البيانات المتاحة
data = self.serial_port.readline()
if data:
# تحويل البيانات إلى نص
text = data.decode('utf-8', errors='ignore').strip()
if text:
# عرض البيانات في واجهة المستخدم
self.root.after(0, self.log_message, f"📥 ← {text}")
except UnicodeDecodeError:
pass
except:
pass
time.sleep(0.01)
thread = threading.Thread(target=read_from_serial, daemon=True)
thread.start()
def send_led_command(self, led_name):
"""إرسال أمر لمصباح"""
if not self.connected:
messagebox.showwarning("تحذير", "غير متصل بـ Pico")
return
# تحقق من حالة الزر الحالية
btn = self.led_buttons[led_name]
current_text = btn.cget("text")
if current_text == "إطفاء":
command = f"{led_name}:ON"
btn.config(text="تشغيل", bg='#28a745')
else:
command = f"{led_name}:OFF"
btn.config(text="إطفاء", bg='#dc3545')
self.send_command(command)
def send_buzzer_command(self):
"""إرسال أمر للصافرة"""
if not self.connected:
messagebox.showwarning("تحذير", "غير متصل بـ Pico")
return
if self.buzzer_btn.cget("text") == "تشغيل الصافرة":
command = "B:ON"
self.buzzer_btn.config(text="إطفاء الصافرة", bg='#28a745')
else:
command = "B:OFF"
self.buzzer_btn.config(text="تشغيل الصافرة", bg='#dc3545')
self.send_command(command)
def on_closing(self):
"""تنظيف الموارد عند الإغلاق"""
self.disconnect()
self.root.destroy()
# تشغيل التطبيق
if __name__ == "__main__":
root = tk.Tk()
app = FixedDesktopController(root)
# إضافة دالة للإغلاق الآمن
root.protocol("WM_DELETE_WINDOW", app.on_closing)
# جعل النافذة في المنتصف
root.update_idletasks()
width = root.winfo_width()
height = root.winfo_height()
x = (root.winfo_screenwidth() // 2) - (width // 2)
y = (root.winfo_screenheight() // 2) - (height // 2)
root.geometry(f'{width}x{height}+{x}+{y}')
root.mainloop()
بعد رفع النص البرمجي على لوحة راسبيري باي بيكو 2W، قم بتشغيل النص البرمجي الخاص بنافذة التحكم، وستظهر لك نافذة التحكم. قم باختيار المنفذ المتصل بلوحة راسبيري باي بيكو بالحاسوب، ثم اضغط على زر الاتصال، وبعد ذلك يمكنك التحكم في المصابيح والصفارة.